How To Fix svchost.exe Constant High CPU Usage & Speed up your computer

svchost provides a shared service process on Windows computers allowing a number of services to run under it in-order to reduce resource consumption, while this approach is smart saving system resources this makes diagnosing and rectifying issues tough as you need to dig out the exact service running under svchost.exe process causing issues.
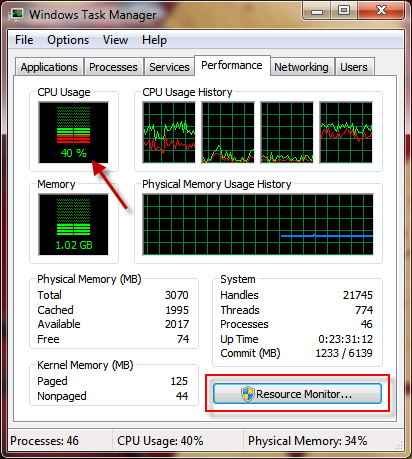
One of the most common issue with svchost.exe is it consuming constant high CPU usage in background, the same issue occurred on my computer where svchost.exe was constantly using 40% processor cycles in computer idle position on my 4 Core CPU. The solution to this involved identifying the culprit service running behind this process and disabling it as demonstrated after the jump.
svchost.exe high CPU usage
svchost.exe is a generic host process name for services that run from dynamic-link libraries and any one of these underlying dll's/services can be the cause of constant background CPU usage, here is how to identify the problematic service and disabling it on Microsoft Windows 7:
  • Open "Windows Task Manager" (CTRL+SHIFT+ESC) and switch to "Performance" tab.
  • Now, click the "Resource Monitor" button.
  • svchost.exe high CPU usage
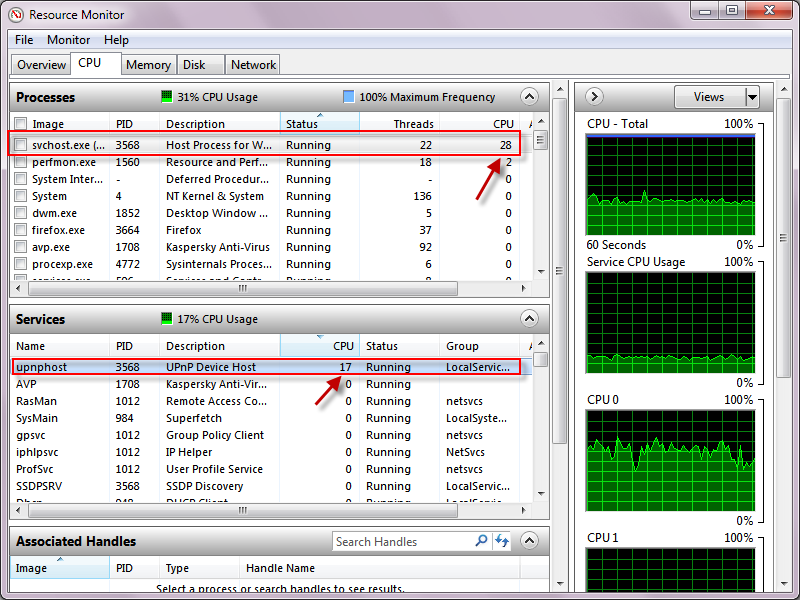
  • Switch to "CPU" tab in "Resource Monitor" and click svchost.exe row, As we can see the bottom pane now shows "UPnP Device Host" eating-up CPU cycles in this case.
  • svchost.exe process
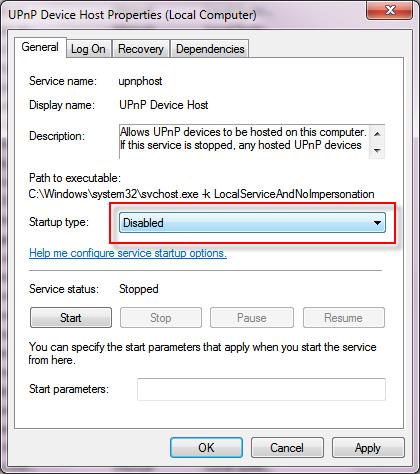
  • We can now right-click the service and stop it from here only or launch services.msc mmc panel to disable it all together.
  • disabled service
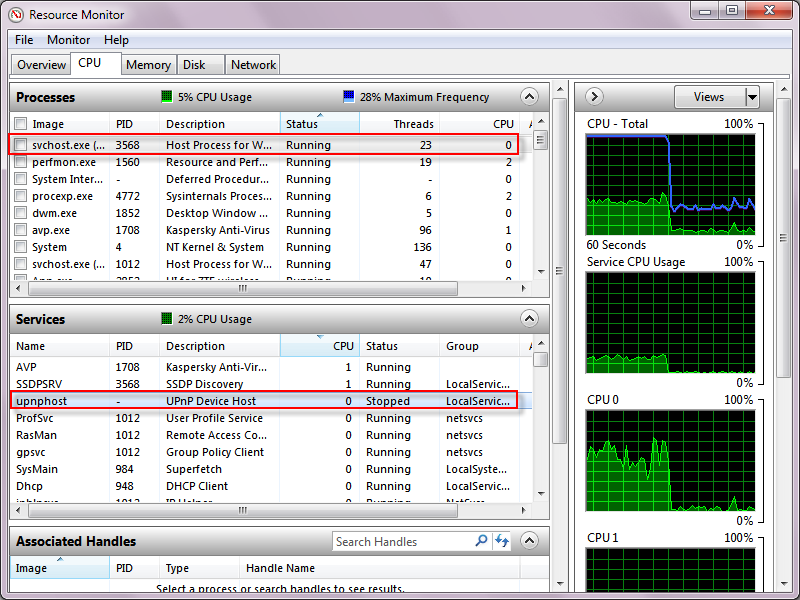
  • As you can see now the CPU usage is now back to normal.
  • high cpu usage fixed


Source
http://megaleecher.net/svchost.exe

Toddler Trap - Locking Keyboard & Mouse for Cleaning or Or Preventing Toddlers From Messing Your PC

Cleaning keyboards with the PC on will lead to funny things happening on the screen which sometime result in horrifying disasters like getting your most important files deleted etc. Then getting your computer keyboard and mouse locked is a much needed functionality while cleaning it or when you have toddlers around your computer.


ToddlerTrap
Here comes a free portable utility called Toddler Trap that lets you achieve this functionality with ease, just launch the small application and it will take focus negating any keystrokes and mouse movements.
Once activated the only action you can take with your keyboard or mouse is to close the application using the X button.
Download:
http://www.mediafire.com/?l498kntgyhnpg05


If you experience any problem installing it or have any queries do reply back via the comments.


BlueStacks - Run Android Apps on Windows PC


The application eco-system of Google's mobile operating-system Android is increasing everyday, to take advantage of this ever-increasing application, base virtualization on platforms like Windows OS is already getting attention. To get things moving, a new software application for Windows platform. BlueStacks is out now enabling users to run android applications on Windows computers.


BlueStacks allows users to run Android OS apps on Windows PCs with instant switching between the two. BlueStacks helps PC manufacturers to ride the Android impetus by enabling Android apps on x86-based tablets, netbooks, notebooks & Windows PCs. With the new cross convertible form factors, BlueStacks completely eliminates the need to carry two devices. The end consumer benefits from getting both Android and Windows at just one PC.

Download:


More Power Applications Coming Soon ! Stay Tuned 

Spice Up Windows 7 Taskbar with Taskbar Meters

Windows 7 has one of the best features in the taskbar and we have covered how to texturize Windows 7 taskbar. Here is another simple application which can furthur spice up the taskbar with Task manager and memory meters. Taskbar Meters are incredibly simple meters that live in the Windows 7 task bar. There are two application included in the meters, one that shows CPU utilization and another that shows memory. Taskbar Meters also features jumplist, so that you can quickly open taskbar and resource monitor.
taskbar meters
Jumplists support is available on Taskbar meters and it gives quick access to Task Manager and the Resource Monitor to determine what’s slowing down your computer.
Jumplists
The update frequency and percentages that determine “yellow” and “red” states are configurable.

You can pin these application to the taskbar so that you can continously monitor the memory usage and CPU usage.
Download Taskbar Meters


!!!Windows 7 [x86 and x64] 32-bit and 64-bit Direct Download Links from Microsoft !!!

!!! Windows 7 [x86 and x64] 32-bit and 64-bit Direct Download Links from Microsoft !!!

October 22 was the date, when Windows 7 retail was finally launched by Microsoft but being a bit preservative, Microsoft never makes available official download links that allow retail customers to download setup installer. Inspite of all their efforts, the direct download links to download Windows 7 are leaked. The installation files of Windows 7 are hosted on msft-dnl.digitalrivercontent.net server owned by Digital River (the delivery partners for Vista) . The Windows 7 installation files are meant as a way of ESD (Electronic Software Distribution).Posted Image

The Windows 7 setup installer package comes in 3 parts, which is an executable that starts the extraction or unpacking and installation process, plus setup1.box and setup2.box. After extracting all content to a folder named ExpandedSetup, the installation files should be the same with what contains on a DVD.

Windows 7 Direct Download Links

32-bit Windows 7 Professional x86

*
http://msft-dnl.digitalrivercontent.net/msvista/pub/X15-79643/Win7-P-Retail-en-us-x86.exe


File Size: 69.78 MB
MD5: 204D02EA3AB587B70621A7EC99B3F1B8
SHA-1: 60BA243A05261AA7A3AF9A3ADF509E8069B6E89
1

*
http://msft-dnl.digitalrivercontent.net/msvista/pub/X15-79643/setup1.box


File Size: 2.04 GB
MD5: D5CC1E45D6EB57B8500DBCF622F39637
SHA-1: EDAA9BA294EA7E49D4FE731E81CDD1E3C6168F51


*
http://msft-dnl.digitalrivercontent.net/msvista/pub/X15-79643/setup2.box


File Size: 137.59 MB
MD5: FAB28838A97E875D27E4E7239F42131C
SHA-1: 78D8ED22DF4FCDA102B72D41420D9854DC0DF7B4


Windows 7 Direct Download Links

64-bit Windows 7 Professional x64

*
http://msft-dnl.digitalrivercontent.net/msvista/pub/X15-79946/Win7-P-Retail-en-us-x64.exe


File Size: 75.9 MB
MD5: 73D13A1000069E372F7478CF1C426B7A
SHA-1: 6B7D87BF0BE0D3BAE4A5E4550260BDF6A5600534


*
http://msft-dnl.digitalrivercontent.net/msvista/pub/X15-79946/setup1.box


File Size: 2.66 GB
MD5: 7B29E21B7F6BC0850E65085205B5EAFE
SHA-1: 47D4131ACD1DA3A96F19244FE4D840EB18C2057C


*
http://msft-dnl.digitalrivercontent.net/msvista/pub/X15-79946/setup2.box


File Size: 160 MB
MD5: 87DCC913A7BBBFCFA2C2526C2E894F97
SHA-1: 4076CA5224D6D2E7338AB286BF31912D8404E016


Note: If you receive corrupted/incomplete files,better use a download manager like Free Download Manager to download, as the server seems to close connection once the size reaches 2 GB.

After downloading the files, simply double click on the executable, e.g. Win7-P-Retail-en-us-x86.exe to start unloading the box and to install Windows 7. Note that 3 files must be put together in the same directory. You still need a product key to activate installed Windows 7.

The 3 files doesn’t provide any bootable ISO file which you could burn to make a disc.

To make a bootable disc using the 3 downloaded files go through my Tutorial to Create and Make a Bootable Windows 7 ISO DVD from EXE plus Setup1.box and Setup2.box Files

Tutorial to Create and Make a Bootable Windows 7 ISO DVD from EXE plus Setup1.box and Setup2.box Files

To create a bootable disc from the downloaded files simply follow these steps:

* Copy all the 3 downloaded files (the .exe, setup1.box and setup2.box) in one single drive (for this tutorial, let’s assume the files are put in Drive C i.e. C:\ ).
* Right click on each of three files, select Properties, and then click on Unblock button to prevent files from unable to be accessed. Click OK when done.

Posted Image

# Run the exe (if on Vista on windows 7 RC or RTM or OEM run the exe as administrator by right click and select “RUN as ADMINISTRATOR”), the exe will extract the .box files and will create a new folder with name “expandedSetup” consisting Windows 7 setup files.
# Exit from Install Windows wizard dialog.
# Check for the oscdimg.exe %SystemDrive%\Windows\System32 folder. If you don’t have any such file in your System32 folder, then download it from
http://www.4shared.com/file/143692991/ae685983/oscdimg.html

and put it in %SystemDrive%\Windows\System32 folder.

Posted Image

* Now Open the command prompt (with administrative privileges in Vista /in XP command prompt opens with administrative privileges by default) . To open command prompt :

1. Click on Start button.
2. Locate the Command Prompt menu item (inside Accessories under All Programs).
3. Click on Command Prompt (in XP) for Vista : Right click on Command Prompt.
4. On the pop-up right click context menu, select “Run as Administrator”.

* In the command prompt run the following command:
oscdimg.exe –bC:\expandedSetup\boot\etfsboot.com –u2 –h -m -lWIN_EN_DVD C:\expandedSetup\ C:\Win7.iso


If the code doesn't work use :


oscdimg -bC:\expandedSetup\boot\etfsboot.com -h -u2 -m -lWIN_EN_DVD C:\expandedSetup\ C:\win7.iso


For 64-bit version if the above two commands doesn't work! use :

oscdimg.exe –bC:\expandedSetup\boot\bootsect.exe –u2 –h -m -lWIN_EN_DVD C:\expandedSetup\ C:\Win7.iso
Posted Image

* All work is done, a bootable ISO DVD image is created in your C:/ Drive named “Win7.iso” . Now, use any CD/DVD burning software like Nero, Ultra ISO , Alcohol 120% or any other, to burn the image in a DVD disc.

Note: – The complete tutorial assumes that all the 3 files (the .exe and Setup1.box and Setup2.box files) are put in the C Drive i.e. C:\ of your system ( as the command run from the command prompt in the last step uses the path as C:\. If you wish to put files in some different directory or folder, you need to modify the path in command you going to run in command prompt. If you are not familiar with cmd commands, I would suggest you to follow the tutorial step by step and put all 3 files in your C:\ only.

Enjoy, your genuine copy of DVD disc !!!

If any problem occurs in code, then try this code:
oscdimg -bC:\expandedSetup\boot\etfsboot.com -h -u2 -m -lWIN_EN_DVD C:\expandedSetup\ C:\win7.iso


Tutorial to extract all editions or versions(SKU) of Windows 7 from downloaded Windows 7 ISO made from EXE plus Setup1.box and Setup2.box Files

Unlike, Windows Vista, Windows 7 ISO consist of all versions within it, but is locked to install only the Professional version. To unlock this boundation , just follow the following steps:

* Download and Install Ultra ISO
* Open the generated ISO File from exe , Setup1.box and Setup2.box
* Now search for the ei.cfg file and delete it ,as show in the following ScreenShots:

Posted Image
Posted Image

# Once done, click on File > “Save as” and save the new ISO file with some new name.
# Burn the new and modified ISO using your favorite CD/DVD burning software like Nero, Power ISO or ULTRA ISO itself.
# You are done now, during installation a screen will prompt asking the version to select for installation like:Posted Image

You are done now. You can install any version of Windows 7 from your downloaded Windows 7 professional files.
New Themes for Windows 7 from Microsoft

The most awaited release of the year, Windows 7, is available from today (October 22nd 2009). You can do lots of customizations on Windows 7 like themes, wallpapers etc and Microsoft has released set of new themes for Windows 7. These themes are mainly of product brands and can also be said as sponsored themes. These brands include Coca-Cola, Ducati, Porsche, Gears of wars, Ferrari etc. These themes includes wallpapers of the respective brands packed in them.
New Themes_1
New Themes_2


New Themes_3
You can download these themes from Microsoft Website.

Download Windows 7 Themes

Source:-Click Me

Windows 7 Tutorial Speed Up System Super Fast

1.How to Windows 7 Speed Up SYstem  To get started, download and install SpeedUpMyPC 2009. The installation is very straight forward – you’ll mostly click “Next” a bunch of times. SpeedUpMyPC 2009 does require the Microsoft .NET Framework 3.5 to be installed on your PC, but  install it for you if not already there.

2.If you did need to install the Microsoft .NET Framework 3.5, you’ll need to reboot before the installation can complete.


3.Once your PC restarts, depending on your PC/security settings, you may get a prompt asking if you want to run SpeedUpMyPC 2009 (the screenshot below is from XP, it will look slightly different if you’re using Vista). Click Run.


  1. The installation will now complete. Make sure the Run Uniblue SpeedUpMyPC 2009 box is checked, and click the Finish button.
  2. click to enlarge
  3. If there’s an update available, you’ll be prompted to download it. Click Yes.
  4. In the bottom right corner of the main SpeedUpMyPC 2009 window, click the Install updates button. You’ll go through a similar installation as outlined in the previous few steps, but it will be faster.
  5. click to enlarge
  6. Once the “second” installation has completed (assuming there was an update to install) – SpeedUpMyPC 2009 will begin to scan your system for possible optimizations.
  7. click to enlarge
  8. It’s at this point where you can decide if you wish to purchase SpeedUpMyPC 2009 based on the results of the scan. As you can see in the screenshot below, SpeedUpMyPC 2009 found over 1500 files and optimization changes to make. Click the Register now button in the bottom left corner of the main window.
  9. click to enlarge
  10. If you already have an activation key, enter it in the space provided and click the Activate now button. Otherwise, click the Purchase Online button.
  11. With SpeedUpMyPC 2009 now activated, click the Optimize all button in the bottom right corner.
  12. Depending on the programs you have open, you may be prompted to close some of them. Save anything you may be working on, and then click the Close all and continue button.
  13. And SpeedUpMyPC 2009 will now optimize your system.
  14. Select the Overview tab at the top of the window, and in the left pane you’ll notice that your system performance is now optimized.
  15. Now we’ll take a look at some of the settings. Click the System Scan tab. In the AUTOMATIC OPTIMIZATION AND CLEANUP section, you may want to place a check in the Perform automatic optimization and cleanup after scan so that everything happens as soon as you open SpeedUpMyPC 2009.
  16. Now select the Cleanup tab. From here you can select which drives you want SpeedUpMyPC 2009 to scan.
  17. Click the Files to find tab. This is a list of the files that SpeedUpMyPC 2009 will look for and clean up when it finds them.
  18. Select the Optimization tab from the top list, and then select the Applications tab from the left list. By default, the Startup manager section will be displayed. If you’re curious about any of the programs that are set to launch at Windows startup, click the “i” button next to that program name.
  19. Your web browser will open and take you to a page explaining what that process or program is.
  20. Now select the Recovery center tab from the left pane of the Optimization screen. From here you can undo or ‘recover’ any of the changes taht SpeedUpMyPC 2009 makes, should you choose to do so. This is another feature that makes me recommend this software – though generally unnecessary, the ability to revert back to previous settings is a fantastic safety feature.
  21. Finally, select the Settings tab from the top. From here you can customize exactly how you want SpeedUpMyPC 2009 to behave. The options are very straight forward, and one that I would suggest disabling is Launch SpeedUpMyPC 2009 when Windows starts. Though SpeedUpMyPC 2009 is a great tool, it doesn’t need to be run every day. Once a week or so will suffice.
  22. windows 7 tutorial finish speed up your PC That’s it! Feel free to explore the other SpeedUpMyPC 2009 options, and enjoy having a faster PC
 Credits to Original Tut writer.

TO SUPPORT SITE CLICK ADS